Support » Programming Orangutans and the 3pi Robot from the Arduino Environment » 5. Arduino Libraries for the Orangutan and 3pi Robot »
5.c. OrangutanLCD - LCD Control Library
Overview
This library gives you the ability to control the 8×2 character LCD on the 3pi robot, Orangutan SV-xx8, and Orangutan LV-168. It implements the standard 4-bit HD44780 protocol, and it uses the busy-wait-flag feature to avoid the unnecessarily long delays present in other 4-bit LCD Arduino libraries. This comprehensive library is meant to offer as much LCD control as possible, so it most likely gives you more methods than you need. You can comment out unneeded methods (e.g. showCursor()) in OrangutanLCD.cpp to make this library smaller. If you do this, remember to delete OrangutanLCD.o so and restart the Arduino IDE so that the library will be recompiled.
This library is designed to gracefully handle alternate use of the four LCD data lines. It will change their data direction registers and output states only when needed for an LCD command, after which it will immediately restore the registers to their previous states. This allows the LCD data lines to function as pushbutton inputs and an LED driver on the Orangutan and 3pi.
You do not need to initialize your OrangutanLCD object before use. All initialization is performed automatically when needed.
All of the methods in this class are static; you should never have more than one instance of an OrangutanLCD object in your sketch.
OrangutanLCD Methods
Complete documentation of this library’s methods can be found in Section 5 of the Pololu AVR Library Command Reference.
Usage Examples
This library comes with two example sketches that you can load by going to File > Examples > OrangutanLCD. Note that most of the other libraries have example sketches that use the LCD, so please see these for more OrangutanLCD usage examples.
1. OrangutanLCDExample
Demonstrates shifting the contents of the display by moving the word “Hello” around the two lines of the LCD.
#include <OrangutanLCD.h>

/*
 * OrangutanLCDExample for the Orangutan LV-168, Orangutan SV-xx8,
 *     or 3pi robot
 *
 * This example uses the OrangutanLCD library to write "Hello"
 * on the LCD and then move it around the display area.
 */

OrangutanLCD lcd;

void setup()                    // run once, when the sketch starts
{
}

void loop()                     // run over and over again
{
  lcd.print("Hello");           // display "Hello" at (0, 0), a.k.a. upper-left
  delay(200);

  // shift the display right every 200ms three times
  lcd.scroll(LCD_RIGHT, 3, 200);
  lcd.clear();                  // clear the LCD
  lcd.gotoXY(3, 1);             // go to the fourth character of the second LCD line
  lcd.print("Hello");           // display "Hello" at (3, 1), a.k.a. lower-right
  delay(200);

  // shift the display left every 200ms three times
  lcd.scroll(LCD_LEFT, 3, 200);
  lcd.clear();                  // clear the LCD
}
1. OrangutanLCDExample2
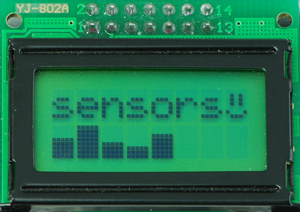
Demonstrates creating and displaying custom characters on the LCD. The following picture shows an example of custom characters, using them to display a bar graph of sensor readings and a smiley face:
 |
#include <OrangutanPushbuttons.h>
#include <OrangutanLCD.h>
#include <stdlib.h>        // used for its "random" and "srandom" functions

/*
 * OrangutanLCDExample2: for the Orangutan SV-xx8, Orangutan LV-168 or 3pi robot
 *
 * This example uses the OrangutanLCD library to display custom characters on
 * the LCD.  Simply push a any user pushbutton to display a new, randomly
 * chosen mood character.
 */

OrangutanLCD lcd;

// define some custom "mood" characters
#include <avr/pgmspace.h>  // this lets us refer to data in program space (i.e. flash)
const char happy[] PROGMEM = {
  0b00000,  // the 5 bits that make up the top row of the 5x8 character
  0b01010,
  0b01010,
  0b01010,
  0b00000,
  0b10001,
  0b01110,
  0b00000
};

const char sad[] PROGMEM = {
  0b00000,
  0b01010,
  0b01010,
  0b01010,
  0b00000,
  0b01110,
  0b10001,
  0b00000
};

const char indifferent[] PROGMEM = {
  0b00000,
  0b01010,
  0b01010,
  0b01010,
  0b00000,
  0b00000,
  0b01110,
  0b00000
};

const char surprised[] PROGMEM = {
  0b00000,
  0b01010,
  0b01010,
  0b00000,
  0b01110,
  0b10001,
  0b10001,
  0b01110
};

const char mocking[] PROGMEM = {
  0b00000,
  0b01010,
  0b01010,
  0b01010,
  0b00000,
  0b11111,
  0b00101,
  0b00010
};

char prevMood = 5;

void setup()                    // run once, when the sketch starts
{
  lcd.loadCustomCharacter(happy, 0);
  lcd.loadCustomCharacter(sad, 1);
  lcd.loadCustomCharacter(indifferent, 2);
  lcd.loadCustomCharacter(surprised, 3);
  lcd.loadCustomCharacter(mocking, 4);
  lcd.clear();                  // must be called before we can use the custom chars
  lcd.print("mood: ?");

  // initialize the random number generator based on how long we hold the button the first time
  OrangutanPushbuttons::waitForPress(ALL_BUTTONS);
  long seed = 0;
  while(OrangutanPushbuttons::isPressed(ALL_BUTTONS))
    seed++;
  srandom(seed);                // the same as: randomSeed((unsigned int)seed);
}

void loop()                     // run over and over again
{
  lcd.gotoXY(6, 0);             // move cursor to the correct position

  // ensure we get a new mood that differs from the previous
  char mood;
  do
  {
    mood = random()%5;          // the same as: mood = random(5);
  } while (mood == prevMood);
  prevMood = mood;

  lcd.print(mood);   // print a random mood character

  // wait for any button to be pressed
  OrangutanPushbuttons::waitForButton(ALL_BUTTONS);
}


